Beaded Curtain Project

I love shiny things! Glitter…tinsel…shiny glass ornaments…crystal and glass beads…stained glass windows…mirrors…diamond-paned windows…Moroccan lanterns…OK…any kind of glass lanterns…I love them all!  Light, bright, airy and happy! I have a general plan for what I’d like to do with our craft room and bringing in more light and sparkle is a must. It’s a dark room on the east side of our house. It only gets light in the early morning hours and while there are 4 windows, one set looks out onto our carport. Right now, it’s dark and the wooden walls and single overhead light are doing nothing to help. I plan to create some Roman shades in light-colored fabric for the windows and hang a beaded curtain over each one. This way, when the shades are up, there will be lots of color and shine…I hope. I’ve also got a small collection of candle lanterns I want to hang up and a lamp set I want to purchase. So far, this is what I’ve got. Thanks to my daughters and my future DiL, I’ve got a total of 21 strands ready to hang.

Screenshot_2016-01-17-10-36-55

— My bunch of bead strands —

P.S. I’m on Snapchat as artcreationist so if you’d like to connect with me there, look me up! 🙂 I’m also on Periscope ( @ArtCreationist5) but I haven’t decided what my first video should be about, or how I can accomplish it well. I hope to have something up soon.

Image

Scattered And Gathered

"Scattered And Gathered" - Mixed Media artwork by Melody Kittles - For more information, please click the photo to go to my deviantART page. You can also download a digital copy for personal use or purchase a print!

“Scattered And Gathered” – Mixed Media artwork by Melody Kittles – For more information, please click the photo to go to my deviantART page. You can also download a digital copy for personal use or purchase a print! (This photo is altered from the original artwork in dimension and also, just slightly in color. There are a couple of elements you can’t see or can only vaguely see.  I’ll hopefully have a better photo tomorrow.)

Taking A Little Break

This week has been pretty hectic, leaving little time for painting or sketching or jewelry making (though jewelry has taken a back seat lately.) I had every intention to draw something today but I’m swamped. I’m going to have to think up another method of organizing. I definitely need a to-do list…a simple one. Complexity is the usual and I’m trying to simplify things. Anyway, I have one or two more photos I edited from our trip to New Orleans that I can share with you today. I hope you’ll enjoy them!

I snapped this shot of a tiny rose in Jackson Square, New Orleans, LA. I used Pixlr Express to edit it a bit but I really didn't have to do to much to it at all!

I snapped this shot of a tiny rose in Jackson Square, New Orleans, LA. I used Pixlr Express to edit it a bit but I really didn’t have to do to much to it at all!

I snapped this shot of glass shards while we were walking the perimeter of St. Louis Cemetary 1. I used Pixlr Express to edit the shot. I did a lot more with this one than the rose photo.

I snapped this shot of glass shards while we were walking the perimeter of St. Louis Cemetary 1. I used Pixlr Express to edit the shot. I did a lot more with this one than the rose photo. 

Every once in a while, I feel somehow as if I’m cheating by posting photos when I’m not a photographer in any real sense of the word, when my loves are music and painting/drawing/jewelry creation/reduce-reuse-recycle crafts, etc. But I guess it’s indicative of how diverse my interests are. It’s also probably the reason I never could pin down a career love, something I wanted to do so badly that I’d devote my all to it. I still don’t have anything like that in the way of a career. But the way I set up my business, if I create a fine art photo, I can sell it.  (I chuckle when I use this term because I’ve /seen/ fine art photography…yeah…I use the term loosely in reference to myself.) If I make a bracelet, I can sell it. If I paint a picture, I can sell it. I create things and I sell them. It’s what I am. It’s what I do. If you click on these photos, you’ll be taken to their respective pages in my deviantART gallery (where you’ll also see at least one witty photo description.) If you want to buy a print and I haven’t enabled that as an option, just drop me a line and I’ll look into it. I may not be able to offer prints of all of them. Right now, I’m just choosing to offer only the ones I believe to be good enough to print. So…I’m getting wordy, which means I’m so extremely tired it’s no longer funny. I’ll stop here. I hope you enjoy the photos!


Theater Costume Project

I’m working on a tree costume for Starshine. She’s going to be a disgruntled and morose British tree in a children’s play later this month. I’ve been working on her costume for a while now. This time, I’m pacing myself, being sure to take time for important things and time to rest. The elements I needed to include were a trunk, leaves, a bird’s nest, and baby birds that move.

For the trunk, I chose a brown stretch knit fabric that had a nifty pattern and lots of glitter. (This is Fairytale Land, after all!) I didn’t have a pattern in the style I wanted. So I had to create one from scratch. I had Starshine lay down on some brown packaging paper and traced out her body lines. I marked where her knees were because I wanted a very straight dress with a flair at the bottom…like a tree trunk and its root base. The sleeves I kept as small a diameter as possible but made them longer than her arms so she could cover her hands with the fabric. I couldn’t make the dress have a turtleneck like I wished. So instead, I cut out a simple head cover out of the leftover fabric that will cover her hair and neck.

For the leaves and treet0p, I created a leaf garland out of green sequin dot fabric and beading wire. It’s light-weight and should make very nice foliage. I’ll attach it to a brown, floppy-brimmed hat we used to use for our SCA events. I’m still working on how to extend some of the leaves out in many directions without making the hat top-heavy.

For the bird’s nest, I’m going to make an overly large scrunchy out of burlap and decorate it with twine and twigs and maybe some leaves. I wanted her to have complete mobility of her hand and not have to worry about the nest falling off during the performance.

The baby birds were a bit of a challenge. I thought right away to use a glove but how to make the fingers look like believable baby birds was another matter entirely! I ended up gluing lots of brown craft feathers to the fingers, enough to cover the color of the glove (though, I did use a black glove). I cut somewhat large triangles out of bright yellow felt and glued those to the tips of the fingers. The audience should have a nice view of those yellow beaks. I have a photo of the baby bird glove that I can share with you today.

Baby Birds for Tree Costume

Baby Birds for Tree Costume ~ The dress fabric is in the background and the burlap I’m using for the nest is wrapped around the bottom of the glove. It’s still just a piece of fabric right now but tomorrow should see it form into more of a scrunchie nest. 🙂

I still have a good bit of work left to do on this project but it’s coming along quite nicely! I hope you’ve enjoyed this update. I’ll share more photos as the project progresses. If you’re in the area and would like to see the play, it will take place at the Eunice Players Theater in Eunice, LA on June 25-28 @ 7 pm and the matinee performance will be on June 29 @ 2 pm.

Acting is like a Halloween mask that you put on.”  ~River Phoenix

Project Updates

We’re still working steadily on our Steampunk projects. I finished a nifty shirt on Saturday and started building some of  Starshine’s inner workings. The inner workings won’t be complete for another day or so.  Her dress is mostly finished, with only the closure remaining. I’m still deciding on how best to do that. Her apron is complete. The photos I’m sharing here are of my completed shirt and the first day’s progress on the inner workings. I’ve worked on it a bit more since those photos were taken and I’ll upload a photo again when the whole outfit is complete.

First, the shirt…

I created this shirt with some fabric that was given to me several years ago. I used vintage pattern Simplicity Jiffy 7569, option 2. The only modification is the lace edging. Since the pattern photo showed the hem to be a bit shorter than I was looking for, I simply serged the edge and then topped it with the lace. The lace I used was from a 55" bolt (or so) and I only had somewhere around 1/8 yd. I cut it into 2" strips and gathered it. My shirt is quite comfortable and I can't wait to make more.

I created this shirt with some fabric that was given to me several years ago. I used vintage pattern Simplicity Jiffy 7569, option 2. The only modification is the lace edging. Since the pattern photo showed the hem to be a bit shorter than I was looking for, I simply serged the edge and then topped it with the lace. The lace I used was from a 55″ bolt (or so) and I only had somewhere around 1/8 yd. I cut it into 2″ strips and gathered it. My shirt is quite comfortable and I can’t wait to make more.

And Starshine’s inner workings…

I won't go into too many details. I don't want to spoil the surprise. I'll break down the process in another blog post if anyone is interested. The ingredients used here are jewelry and scrapbook findings and wire, needlework plastic, brown acrylic paint, gold hologram glitter fingernail polish, recycled computer parts, and probably more. There was no glue used in the part of the project. I have nothing against glue but ones that would hold all this type of stuff take a while to dry and I still have a lot of work left to do on this piece.

I won’t go into too many details. I don’t want to spoil the surprise. I’ll break down the process in another blog post if anyone is interested. The ingredients used here are jewelry and scrapbook findings and wire, needlework plastic, brown acrylic paint, gold hologram glitter fingernail polish, recycled computer parts, and probably more. There was no glue used in this part of the project. I have nothing against glue but ones that would hold all this type of stuff take a while to dry and I still have a lot of work left to do on this piece.

Here's the second part of Starshine's inner workings. I think it's probably self-explanatory but if I'm wrong, you'll have to wait until the whole outfit is done before I'll tell more about it. For this piece, I used gold metallic trim, Fabri-tac glue, a super-fantastic-awesome button I've been dying to use on /any/ project, and some recycled plastic from a broken poster frame that John cut to size for me.

Here’s the second part of Starshine’s inner workings. I think it’s probably self-explanatory but if I’m wrong, you’ll have to wait until the whole outfit is done before I’ll tell more about it. For this piece, I used gold metallic trim, Fabri-tac glue, a super-fantastic-awesome button I’ve been dying to use on /any/ project, and some recycled plastic from a broken poster frame that John cut to size for me.

Stay tuned for more Steampunk fun…

“It is not so for art in appreciation because art is concerned with human behavior. And science is concerned with the behavior of metal or energy. It depends on what the fashion is. Now today it’s energy. It’s the same soul behind it. The same soul, you see.” ~ Josef Albers

Isn’t it pretty nifty that Steampunk is a bit of both? Granted, mine leans far more to the artsy side than the scientific one but given the correct parts and enough time, I’d love to build functional pieces to add to our costumes. What fun that would be!

Making Displays Part 2

This week is probably going to be my busiest week yet and here I am blogging. I had to pick a busy week to add in a project, I guess. I have a tendency to do that so it’s not really a surprise to me. I am really happy with the way my mannequin head is coming along. I thought I’d talk about the next step, which was makeup. This part was not included in the blog post I shared yesterday. This is something I just wanted to add in. I really wanted to see how it would come out and if it would be worth it. Sometimes, you just have to jump in with both feet and give it your best shot.

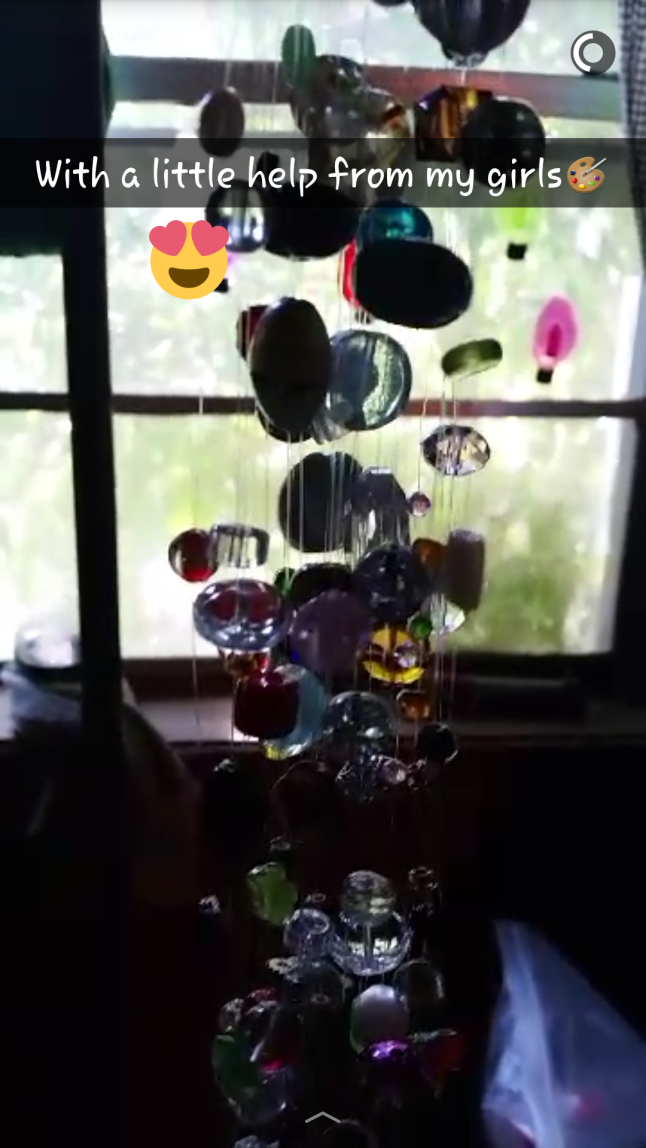
In case you may have been in doubt, I love glitter. A lot. I’m the type of parent that gets excited when my kids want to use glitter in projects. So when considering different options for Pianola’s cosmetics, I definitely purchased a multi-pack of ultra-fine glitter. At the time, I wasn’t sure what colors I wanted to use for her eyes and lips. I also purchased a small bottle of acrylic craft paint in ‘antique copper’. I used acrylic paint from an artist kit Magiba received for Christmas (with her permission, of course) for the cosmetics.

To glitz up my project, I used a sponge brush to lightly brush a bit of the antique copper all over the mannequin head. It gave my project a more distressed look, a bit more vintage. You can barely see this in the photos but there are small streaks of copper all over the mannequin head. I let that dry. While it was drying, I did a bit of research to find some really fantastic eye makeup. I found this nifty photo on Pinterest and used it for inspiration. Since my girl has lots of blue in her skin, I chose to go with blush pink, light blue, blue, yellow ocher, magenta and black for her eyes. I used a brilliant red and orange blended together for her lips. I added matching glitter to my paints. I would recommend mixing the colors as you are ready to use them if you are going to layer them over one another. I painted the blush pink without glitter over the eye to give me a more solid base and make the colors easier to see. While that was drying, I painted her lips. The things I love about acrylics are that they usually cover a surface nicely with one coat and they dry quickly. Next I decided it might be easier to paint the eye makeup if my girl had eyebrows. I lightly tapped my brush on the brow bone to create a slightly arched line over each of her eyes using black paint. Then I painted over each eye completely with light blue paint. I accented the corners of the eyes with the darker blue and created a feathered effect. I used the gold (yellow ocher) to line the upper lid of each eye, then painted over the remainder of the light blue with the magenta. This created an interesting effect. The pink is indeed vibrant but you can still see some of the blue coming through and also a bit of purple, though that has to be an optical illusion. I let each color dry completely before adding the next so they wouldn’t mix. Lastly, I lined the lower lid and the outer and inner corners of each eye with black. I created a few curls and leaves on each eye and did them each a little bit differently. I have a hard time creating the same thing twice. Next, I decided to add to the steampunk effect by adding a little ‘hardware’. I painted a large bolt in the center and just above her eyebrows. I also painted on a few screws. I used my copper paint for those and accented them with black. Once all the paint was dry, I gave her another two coats of mod podge to seal the paints well.

The last step will be to add some fabulous eyelashes, a wig, and some real hardware or acrylic gems. I’m excited to see the completed project! Here’s a picture of Pianola with her makeup. It was pretty hard to get her eyes straight and even harder to get the lips just right. So I settled for odd and quirky. It fits my personality better, anyway. She may look a little odd at this step but keep in mind her eyes are closed and she doesn’t have her wig yet.

Here's one photo showing Pianola's eye and lip cosmetics

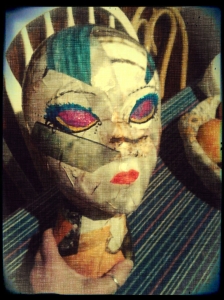
Here’s one photo showing Pianola’s eye and lip cosmetics. John said she looked like a bug!

Here's a closeup showing the bolt and screws. It also shows a closer view of the details of the eye makeup

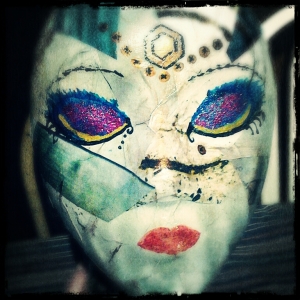
Here’s a closeup showing the bolt and screws. It also shows a closer view of the details of the eye makeup. I used a different lighting effect to bring out how the blue color shows underneath the pink.

I find my joy of living in the fierce and ruthless battles of life, and my pleasure comes from learning something.” ~Auguste Strindberg, Miss Julie, 1888

The above quote only vaguely fits today’s post. I did learn that it’s probably better to spend several more dollars to get the paint that already has glitter added to it. I also learned that for sticking large pieces of paper in small dents and creases, it pays to add a bit more mod podge so that the paper is softened enough to fit into those spaces without tearing. I didn’t tear any of my pieces of paper but some of them were not stuck down as well as they could’ve been. I had no intention of trying to make the paper sit smoothly on the form. I wanted my piece to look edgy and vintage and distressed. I think when her uneven eyebrows and eyes, and her lips that look like she’s smirking, are added to those creases and wrinkles, I succeeded. One thing is for certain, she will certainly stand out and catch the eyes of passing customers. Tomorrow, I’ll post a picture of her with her hair and I’ll hopefully have the eyelashes added on, as well.